Sunday, 27 December 2009
Radiator Brackets
Not much progress over the Christmas period other than fitting the radiator brackets fabricated by GBS (apparently the new cars have these fitted).
I have laid out the wiring harness but that causes issues with the routing, bulkhead penatrations etc.
Sunday, 13 December 2009
Water Jacket (Raceline)
Having bolted the engine mounts to the chassis the next job was to remove the redundant themostat housing at the back of the engine.
The redundant thermostat was replaved with the Raceline water jacket (which includes the thernostat). The raceline unit moves the thermostat from the rear towards the front of the engine which is more suited to the in-line application a required in the GBS Zero.
Thursday, 10 December 2009
Engine fitted
After much preparation I took the plunge and the engine was offered up as for a trial fit .............and it did!!!!!!!!!!!!!
Points to note.
1. Remove the inlet manifold
2. Remove the oil filter
3. Fit the drive shaft as the engine is lowered in.
I must thank my good lady (Diane) for her help guiding the gearbox in and operating the engine crane.
Points to note.
1. Remove the inlet manifold
2. Remove the oil filter
3. Fit the drive shaft as the engine is lowered in.
I must thank my good lady (Diane) for her help guiding the gearbox in and operating the engine crane.
Wednesday, 9 December 2009
All assembled ready to install.
Engine Mounts
With the gear box installed it was time for the fitting of the engine mounts.
The right hand side (drivers side) was straight forward, however the left side (passenger side) required a lug to be cut off and ground flat -see picture.
This side also required spacers to be made. The right hand side engine mount sits further forward than the left hand, which looks a bit strange, but there are no other bolt holes that could be used.
Monday, 30 November 2009
Fitting the Bell housing to type 9 Gearbox
The modified bell housing is attached to the type 9 gearbox (12mm bolts) the replacement gasket was supplied by BGH Geartech.
The shortened gear lever was fitted (8mm bolts)
The thrust bearing was changed from the standard sierra unit for a capri unit (part no CCT133) based on the information supplied on RHOCAR forum.
The shortened gear lever was fitted (8mm bolts)
The thrust bearing was changed from the standard sierra unit for a capri unit (part no CCT133) based on the information supplied on RHOCAR forum.
Sunday, 29 November 2009
Bell Housing Modification
After a couple of weeks riding dirt bikes round the jungles of Cambodia I finally got back to the build.
The amount of metal to be removed was calculated by measuring distance from the gearbox mounting and measuring forward to the bell housing and taking the tunnel widths. Having marked out the dimensions with the dremel, I dedcided to make the cut by hand with a hacksaw rather than using the angle grinder.
Sunday, 1 November 2009
Raceline Sump
Monday, 26 October 2009
Front End & Steering Assembly
The alignment of the wishbones needed adjustment (modification).
Fitted the steering column and checked the travel and it up
The steering rack mountings supplied by GBS were replaced with some 'sexy' billet aluminium units supplied by Rally designs.
Sunday, 18 October 2009
Hub Assembly - front drivers side
Rear Brake line
Body Panels
Tuesday, 29 September 2009
Gearbox modification - BGH Geartech Ltd
I have sent my gearbox to BGH Geartech Ltd for modification to match the gear raitios to the engine and differential ratio to give me a linear performance across the range.
Based on my 170bhp Zetec and Diff Ratio of 3.92 I have opted for the following.
Fast Road - E3 – 2.0 Sporting Close – Heavy Duty
Gear - Ratio - MPH
1st - 2.92 - 41 mph
2nd - 1.86 - 65 mph
3rd - 1.295 - 93 mph
4th - 1.00 - 121 mph
5th - 0.85 - 142 mph
Based on my 170bhp Zetec and Diff Ratio of 3.92 I have opted for the following.
Fast Road - E3 – 2.0 Sporting Close – Heavy Duty
Gear - Ratio - MPH
1st - 2.92 - 41 mph
2nd - 1.86 - 65 mph
3rd - 1.295 - 93 mph
4th - 1.00 - 121 mph
5th - 0.85 - 142 mph
Sunday, 27 September 2009
Gearbox Mount
The gear box mount fitted in place.
The location dead central over the hole allows around 20mm play (forward/backward) which GBS confirmed is acceptable for a Type 9 gear box installation. The width of the standard Ford engine mount needs to reduced slightly to fit between the chassis rails. I fitted a washer between the mount and the chassis to raise the mount clear off the countoured underside (saves having to alter the chassis or the mount).
Friday, 28 August 2009
Hand Brake
At last we have some progress - after much deliberation I settled on using the standard Ford Hand Brake as it best fitted the chassis mountings and gave the best positioning.
The saddle had to be mounted below the hand brake linkage to avoid it catching on the chassis when the hand brake is pulled.
This was done by tapping the linkage to lower the saddle position.
As the standard Ford Sierra cable inner is too long for this application it was cut in the middle and jointed using "Gripples"
Monday, 27 July 2009
Rear of the Year
Thanks to a few rainy days I managed to get the the drive shafts, wish bone, hubs and discs bolted up. The final installation required several trial fits and adjustments to align everything. Once I was happy the bolts were loctite'd in place and a dob of blue paint applied so i could identify what was completed.
Wednesday, 15 July 2009
Installing 7" Sierra differential
Installation sequence (well mine)
1.Lift the differential into position
2.Fit the front bolts B & C to centralise the diff equally between the chassis plates. Check the hole alignment and make any adjustments to the size and location, once happy with the alignment remove bolts B&C.
3. The diff needs to be raised to allow access to install bolt A in to the slotted hole. The bolt is inserted from the drivers side. Once installed the diff can be lowered back to its final position to allow the remaining bolts to be installed.
Note: Make sure you install all washers and spacers before you lower the diff and install the other bolts.
4. Re-install bolts B & C.
5. Install bolt D.
6. Mark and drill the hole (10mm) for the rear diff mounting.
7. Install bolt E.
Tuesday, 14 July 2009
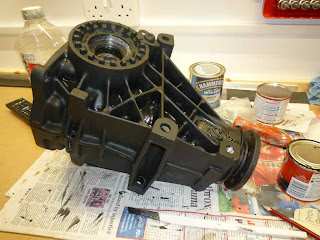
Differential
Having bought two Sierra 7" differentials - ratio 3.62:1 or 3.92:1 after much deliberation and discussion I decided that I would install the 3.92:1 unit as this will give me the best all round performance. I have also decided to upgrade the standard type 9 gearbox to BGH close ratio fast road specification (on the wish list). The diff was prepared (shot blasted and laquered) and ready for installation.
Friday, 29 May 2009
Brake and Clutch Pedals
Installed the Brake and Clutch Pedals.
The bushes are very tight (intrference fit) you will need to press these home using a vice or suitable clamp. Any powder coating inside the bush housing may need to be removed to make it easier (dremel with sanding flapper).
The M10x160mm bolt goes in from the centre of the car and the M10 nyloc nut is fitted on the near side (your right if sat in the drivers seat - looking forward!!) with a washer at either end.
Refurbished Parts
Wednesday, 20 May 2009
Replacing the Lock Barrel on the Ignition Switch - Installation
Replacing the Lock Barrel on the Ignition Switch - Removal
Sunday, 10 May 2009
Tuesday, 14 April 2009
My Minilite Wheels - trial fit on a factory car
GBS trial fit to check dimensions required for modified rear arches
FRONT
WHEEL
Manufacturer: Minilite
Model: MA1570B
Size: 15x7 ET[-]6
PCD: 4x10⁸
Cost : £125.00 + vat = £143.75
TYRES
Manufacturer: Avon
Model: CR500
Size: 195/45/15
Cost £118 + vat = £135.70 each
Rolling Radius = 288.5mm
REAR
WHEEL
Manufacturer: Minilite
Model: MA1590B
Size: 15x9 ET(-)30
PCD: 4x10⁸
Cost : £145.00 + vat = £166.75 each
TYRES
Manufacturer: Avon
Model: CR500
Size: 245/40/15
Cost £128 + vat = £147.20 each
Rolling Radius = 293 mm
TOTALS
Wheel Total = £621.00
TyreTotal = £565.80
Total = £1186.80
WHEEL
Manufacturer: Minilite
Model: MA1570B
Size: 15x7 ET[-]6
PCD: 4x10⁸
Cost : £125.00 + vat = £143.75
TYRES
Manufacturer: Avon
Model: CR500
Size: 195/45/15
Cost £118 + vat = £135.70 each
Rolling Radius = 288.5mm
REAR
WHEEL
Manufacturer: Minilite
Model: MA1590B
Size: 15x9 ET(-)30
PCD: 4x10⁸
Cost : £145.00 + vat = £166.75 each
TYRES
Manufacturer: Avon
Model: CR500
Size: 245/40/15
Cost £128 + vat = £147.20 each
Rolling Radius = 293 mm
TOTALS
Wheel Total = £621.00
TyreTotal = £565.80
Total = £1186.80
Order Placed
GBS - Zero Super Spec Kit ordered - Collection due 15th May 2009.
£250 deposit paid.
Total cost (estimated £10,926.56)
Options
Aluminium body panels
Sports Seat
Seat Runners
4 Point Harness set
Lowered Floor
Rear Wings - Extended to fit wheels
Black Lights and Windsreen Frame
Discs and Calipers Front (New)
Steering Rack - Quick (new)
Wheel & Tyre Upgrade - Minilite & Avon
Rear Disc Conversion
Discs and Calipers Rear (New)
Zetec Engine 2ltr
Zetec Manifold SS
Throttle bodies and ECU
Pipercross filter
Swirl Pot and Pumps
CAT and D CAT
Zetec Engine Mounts
Type 9 Gearbox & Prop Shaft
Dials(full set incl warnings)
Heater (wet system)
Raceline Sump
Water Rail Kit
Heated Windscreen
Powder Coating
LED light kit
Removable Steering boss
Subscribe to:
Posts (Atom)